Chapter 3 Network Management
This chapter contains the following sections :
Mesh Settings
-
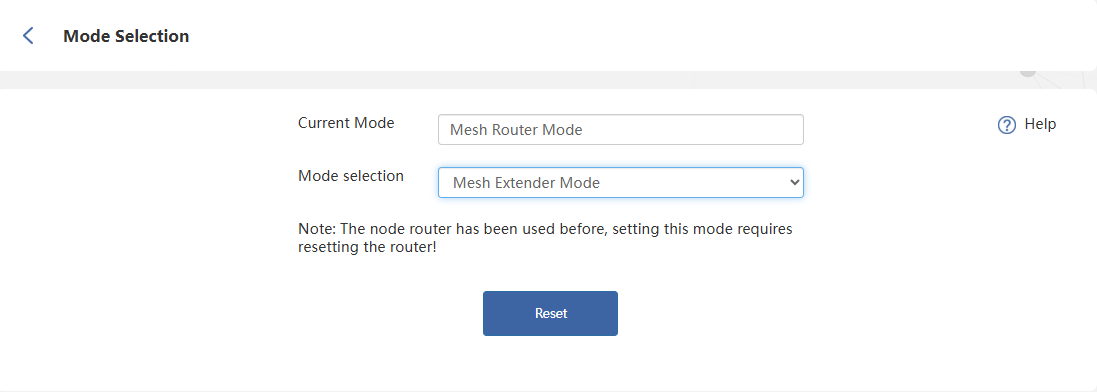
Click Advanced > Mode Selection.
-
Select Mesh Router Mode or Mesh Extender Mode from the Mode selection, then click Next.

Mesh Router Mode
Converts the ISP's wired network into a Wi-Fi for both wireless and wired Internet access. Meanwhile, this mode supports mesh networking, and you can set this mode to pair sub-routers to mesh a network.
- After switching to Mesh Router Mode, the Wan Type is DHCP by default, you can set PPPoE and Static IP manually if it is needed.
- Click Save and wait for the settings to apply. After waiting about 1 minute, click Refresh.

Note for Mesh Pairing:
Two methods for Mesh Pairing, the first is recommended.
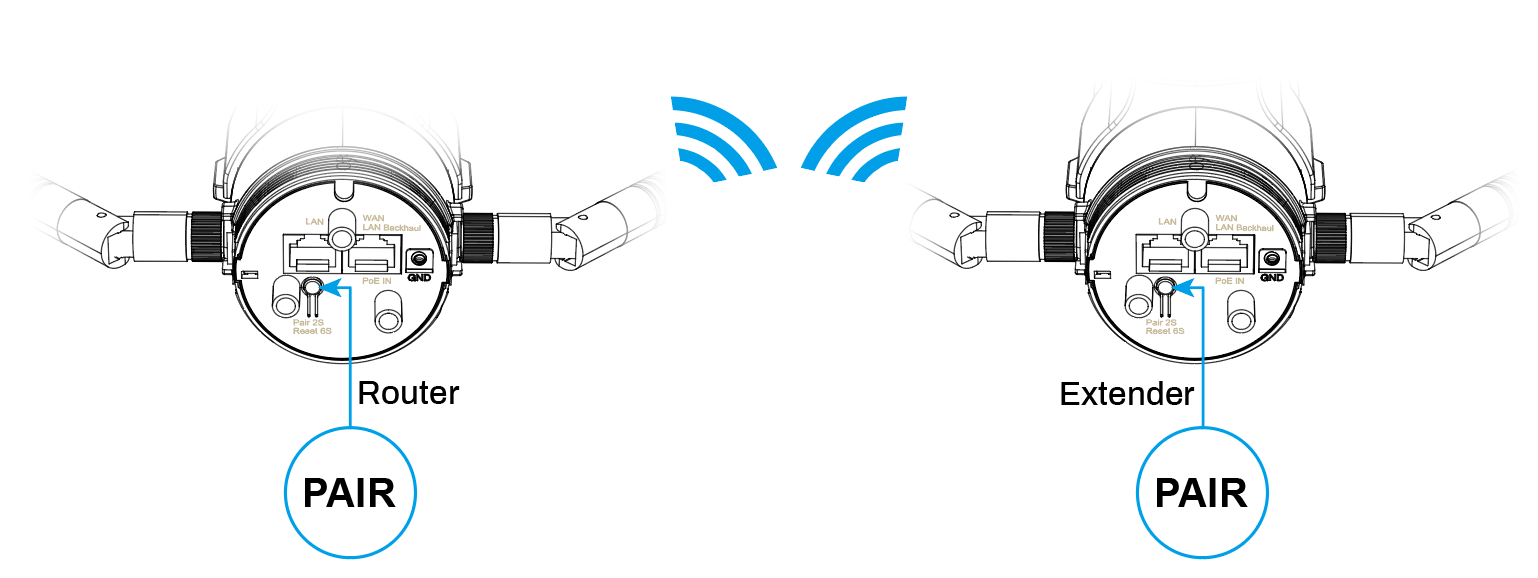
1)Via PAIR Button:
- Turn on the power of other Mesh node router, one note is this product should have been reset.
- Press and hold PAIR Button on the primary router for 2 seconds. Then the LED Indicator switches to slow flashing in blue.
- In 2 minutes, press and hold the PAIR Button on the node router for 2 seconds, the pairing will last 40-120s, at the same time, the LED indicator will be solid blue indicating the pairing is successful.
2)Via WEB Interface:
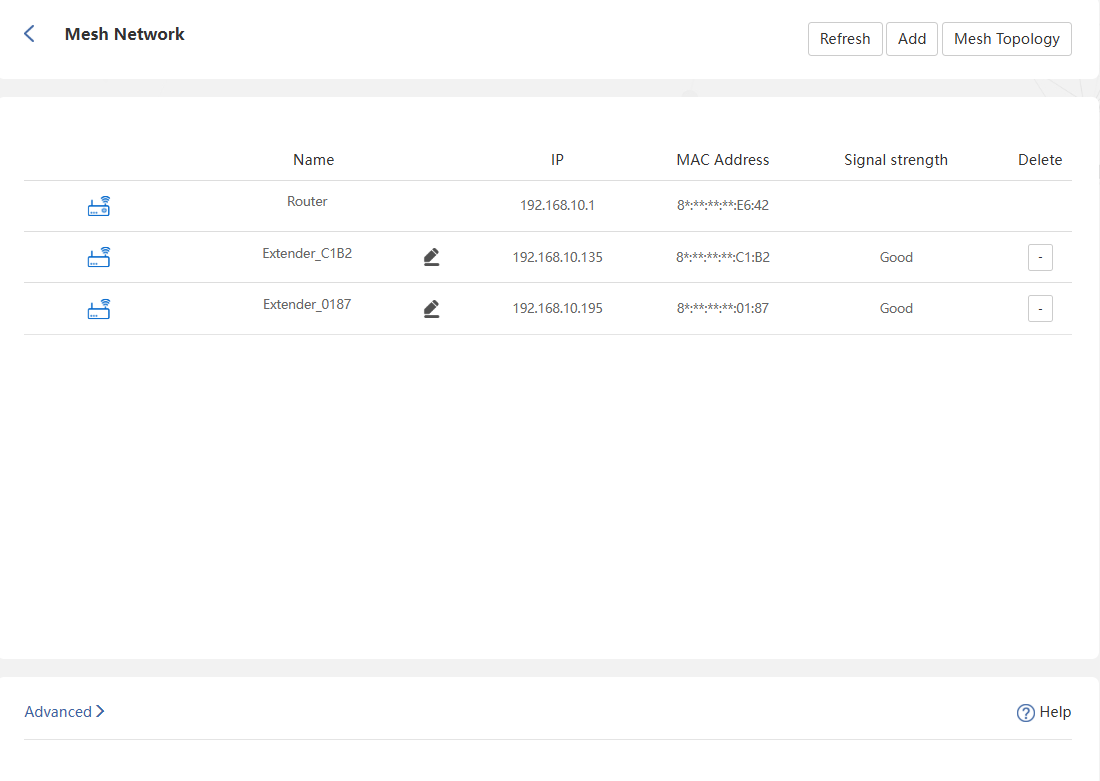
- Click Advanced>Mesh Network.
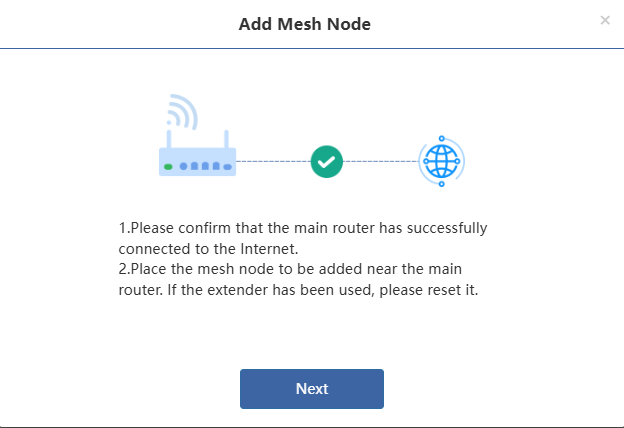
- Click Add, then following the prompt instruction.
- Ensure all Mesh node routers are properly positioned and the main router has an active internet connection, click Next, if the node router is in use, reset it.
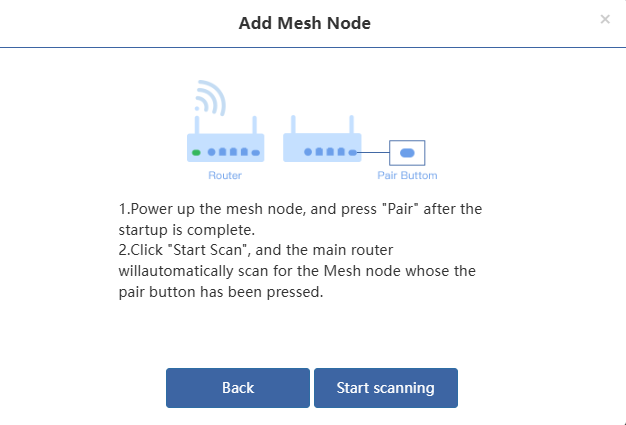
- Confirm the mesh node router is on, if it is not, turn it on, then press and hold the PAIR Button for 2 seconds.
- Click Start scanning, then check the device information listed in the result, tick to add the device.

Advanced Settings
1)Roaming
Roaming helps your devices switch seamlessly between two mesh routers. When you move away from one and closer another router, it will disconnect from the current router and switch to the nearer one to make the internet smoother. And no manual operation is required.
Note: The roaming threshold should only be configured by experienced professionals. If you lack professional expertise in this setting, it is recommended to retain the default value to avoid compromising your network experience.
2)Topology Optimization
When you have three or more paired devices and all devices have completed pairing, you can enable the topology optimization feature. This function can automatically adjust the optimal path based on the signal strength between devices to ensure that all sub-routers and corresponding upper-level devices have the best signal connection status, achieving optimal network coverage.
Note: You can adjust the signal threshold that triggers topology optimization to achieve the best mesh network coverage. If you do not have professional setup experience, it is recommended to use the default settings.
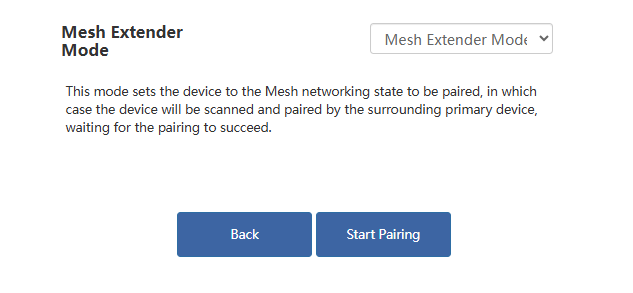
Mesh Extender Mode
This mode puts the device into a Mesh pairing-ready state, where it will be scanned and paired by nearby primary devices. Await successful pairing.
If prompted with Note: The node router has been used before, setting the mode requires resetting the router, please reset the product following the wizard, then, select Mesh Extender Mode during the initial setup.
- Click Start Pairing to put the device into pairing mode, at the same time, press and hold the PAIR button on the primary router for 2 seconds, or add the Mesh device on the configuration interface of the primary router. This pairing process will take approximately 2 minutes.
-
If pairing fails, check whether the primary router is configured correctly, then restart the pairing process by pressing the PAIR button or reentering this device's settings interface。
-
If you wish to switch to another mode after successfully configuring the Mesh Extender Mode, factory reset this device.
Network Settings
The way of network access can be changed as your requirement through configuring the network setting. Choose the WAN Type according to the method provided by the ISP.
-
DHCP: Network parameters configured automatically by your ISP
-
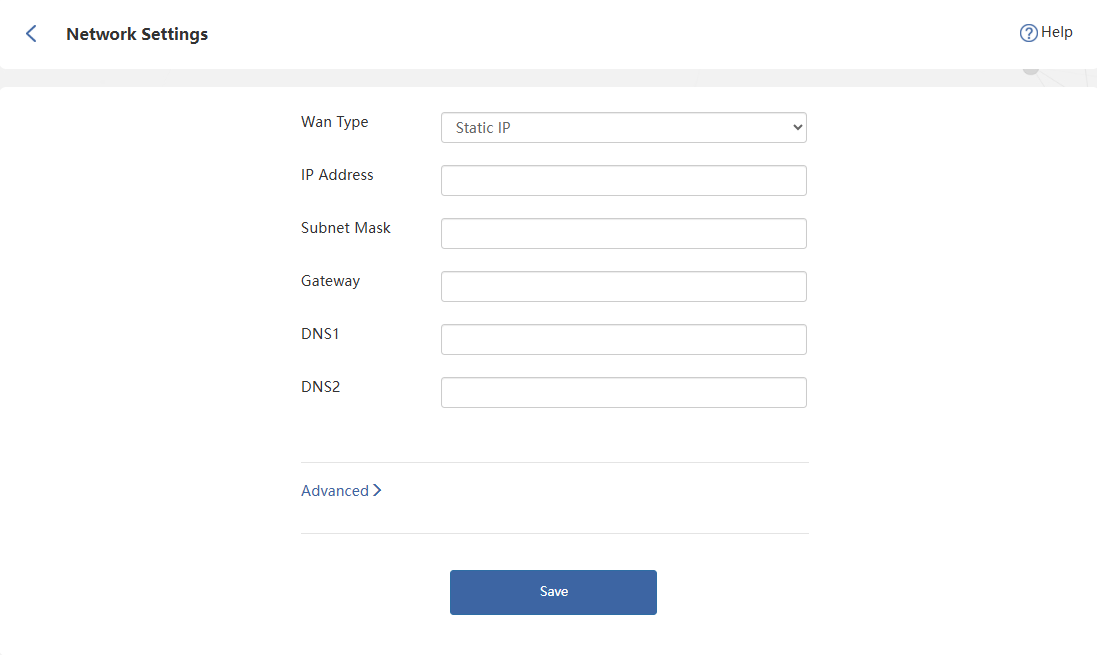
Static IP: Requires manual entry of IP address, Subnet Mask, Gateway, DNS1 and DNS2
-
PPPoE: Requires ISP-provided Username and Password.
-
Advanced > Network Settings.
-
Select Wan Type from the list.
1)DHCP(Dynamic Host Configuration Protocol)
- It assigns network information including IP, Subnet Mask, default Gateway and others, managing and assigning IP without manual configuration.

2)PPPoE(Point-to-Point Protocol over Ethernet)
- It is designed for broadband access methods such as ADSL, fiber optics and others to provide a secure network connection.
- The Name and Password provided by your ISP is required.

3)Static IP
- It assigns fixed IP address for the computer automatically. It is designed for servers, remote access, etc., which require long-term stability to ensure the stability of network connections.
- Correct IP Address, Subnet Mask, Gateway, DNS1 and DNS2 is required.
- It assigns network information including IP, Subnet Mask, default Gateway and others, managing and assigning IP without manual configuration.
Advanced Settings
-
Custom MTU(Maximum Transmission Unit)
The MTU(Maximum Transmission Unit) is the largest size of a data packet that can be transmitted over the network. If your ISP requires you to adjust the MTU size, enable this option. Otherwise, we recommend you to keep it disabled for optimal network performance. -
MAC Clone
If the network operator only permits single device to access the internet, you can enable MAC Clone and spoof the MAC address of the originally connected device. This allows other devices connected to the router to access the internet normally. -
Custom DNS
If the network operator assigned fixed DNS address for you, you can enable Custom DNS and input the address provided. Otherwise, manual activation is unnecessary—the router will automatically obtain DNS addresses.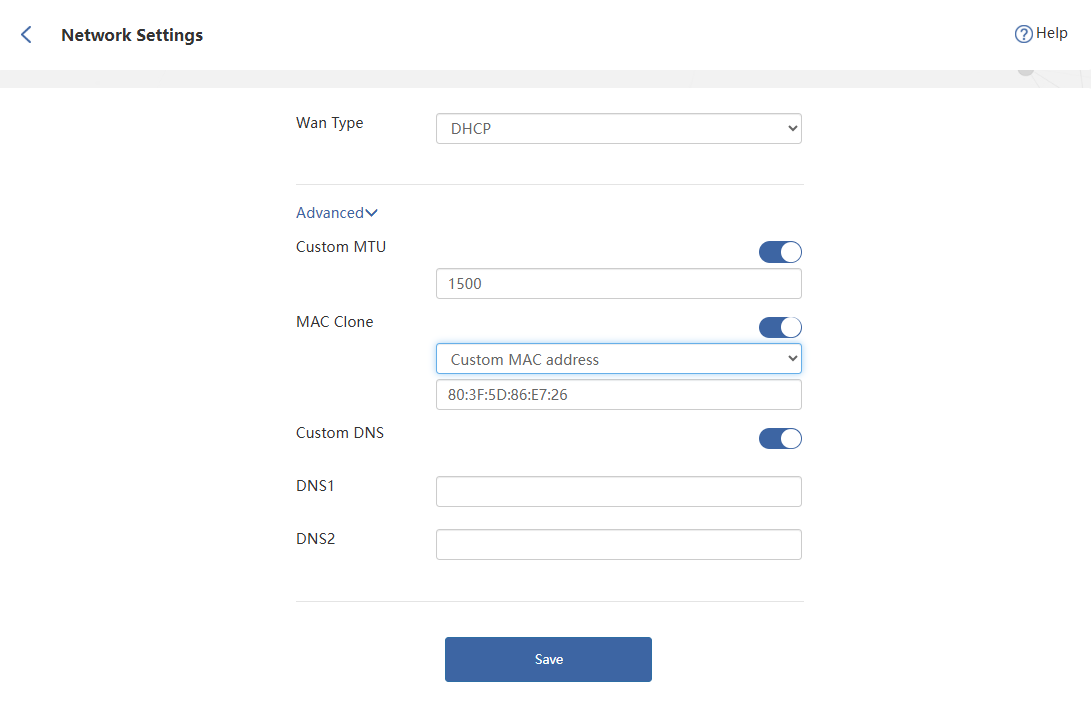
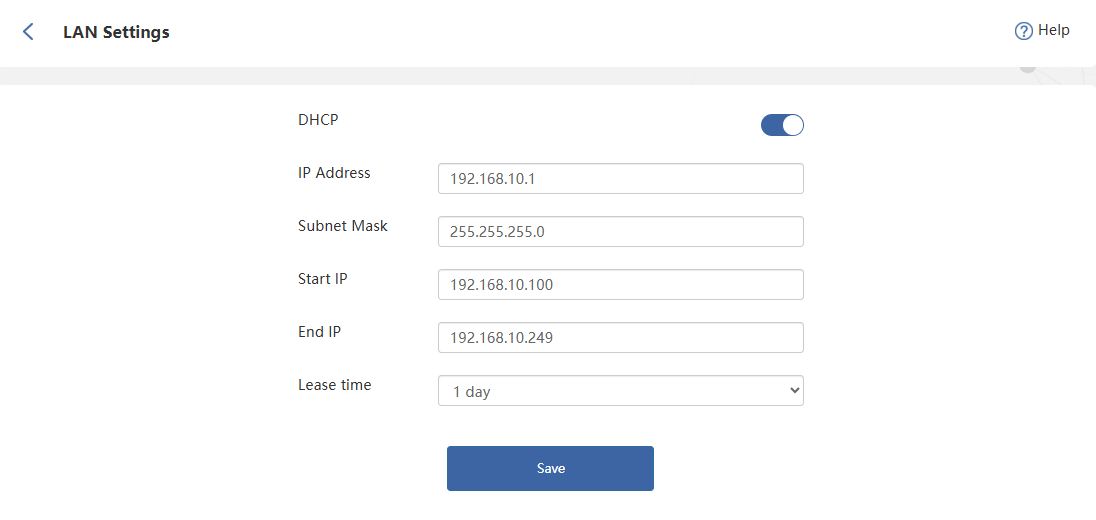
LAN Settings
DHCP(Dynamic Host Configuration Protocol) server automatically assigns IP addresses to devices on the LAN. To modify DHCP settings, refer to the instructions below.
-
Click Advanced > LAN Settings.
-
Click to enable DHCP, and configure the corresponding information.
- IP Address: The IP address from which the router connects to the LAN. This can be used to log in to the router's network management page.
- Subnet Mask: The subnet mask that the router connects to the LAN.
- Start IP, End IP: The range of IP addresses that can be allocated by the router to connected devices.
- Lease time: This is the lease time of the IP address that the device obtains when accessing the router. If you need to modify it, please select it again in the Lease Time drop-down list.
- Click Save to finish the setup.
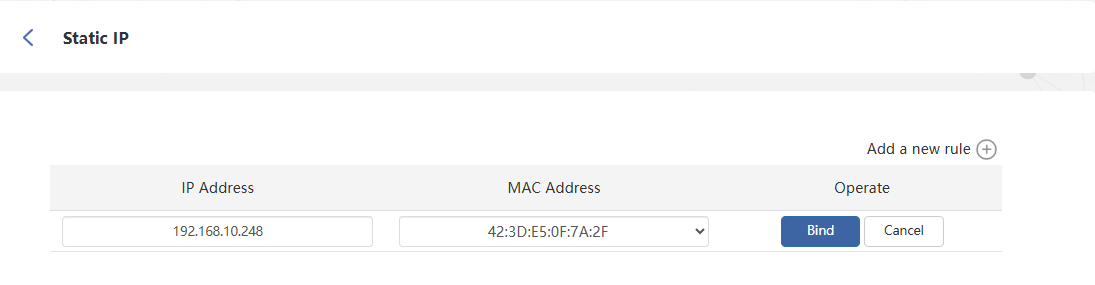
Setting Static IP Binding
It allows you to link the specific IP to the MAC address of customer devices. Using it, you can assign a fixed IP for the specific device.
-
Click Advanced > Static IP.
-
Click Add a new rule at the top right corner.
-
Input the IP Address and MAC Address from the binding device, then click Bind.
MAC Filter
MAC address filtering applies to both wired and wireless devices. Devices were added have no access to the Internet properly, and also cannot access to router's management interface, but can get the IP address asigned by router.
Note: MAC Filter may not apply to the terminals using random MAC address.
- Click Advanced>MAC Filter.
- Click to enable to MAC Filter.
- If the Guest Network Exception is enabled, those devices from the guest wifi will not limited by the function of MAC filter.
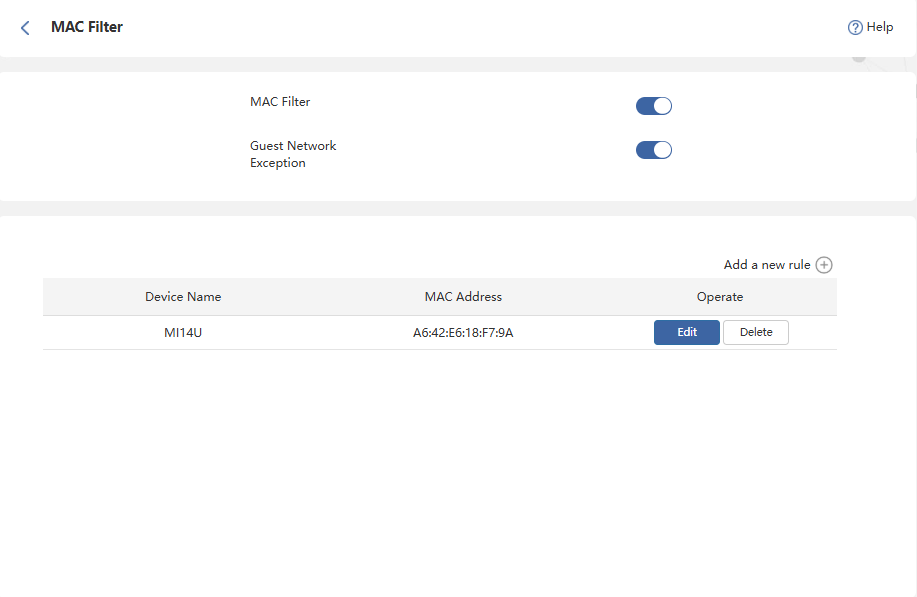
- Click Add a new rule, then select the Device Name and MAC Address to add.

- Or you can manually enter the Device Name and MAC Address to add.

- The device added has been in the list. It is available to edit or delete it.
