Chapter 1 Network Management
This chapter contains the following sections :
• SQM QoS
Network Setting
The way of network access can be changed as your requirement through configurating the network setting.
1 . Access Network setting or More>Network>Network Setting.
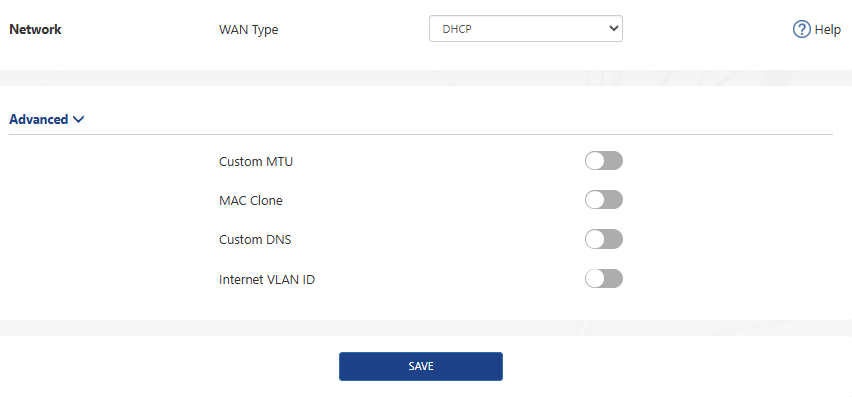
2 . Select your network connection way from the WAN Type list.
1)DHCP(Dynamic Host Configuration Protocol)
- It assigns network information including IP, Subnet Mask, default Gateway and others for the computer, designed for small network environments such as a home or a small office, managing and assigning IP without manual configuration.
- If the ISP(Internet Service Provider) has provided Auto Assign Feature for you, select DHCP from the WAN Type list.
2)PPPoE(Point-to-Point Protocol over Ethernet)
- It functions as a secure connection constructor, including verifying user identity, assigning IP, and others. It is designed for broadband access methods such as ADSL, fiber optics and others to provide a secure network connection.
- If the ISP has provided a Username and Password for you, enter them after selecting PPPoE from WAN Type list.

3)Static IP
- It assigns fixed IP address for the computer automatically. It is designed for network connections, servers, remote access, etc., which require long-term stability to ensure the stability of network connections.
- If the ISP has provided a specificed IP parameters including IP address, Subnet Mask, Gateway, DNS1 and DNS2, select Static IP from the list and enter the information provided by the ISP.

4)USB Tethering
- It works to share network connection after connecting the USB devices to the router.

5)PPPoE Dual Access
- Using dual PPPoE broadband lines, PPPoE Dual Access achieves balanced distribution via the technology of Load Balancing. Designed for improving the network bandwidth and stability, so it is for the occassion that requires large data transmission.
- Enter the account and password provided by the ISP in Username and Password. Then select DHCP or Static IP from Second WAN list, one note is that IP and Subnet Mask are required for Static IP.

6)PPTP Dual Access
- PPTP Dual Access refers to the dual-network accessing method of using two PPTP VPNs. With it, users can configure two PPTP VPN to simultaneously access the Internet, enhancing the reliability of bandwidth and network.
- Enter Username, Password, Server URL, then select DHCP or Static IP, one note is that IP and Subnet Mask are required for selecting Static IP.

7)L2TP Dual Access
- L2TP Dual Access uses two L2TP VPN connections to access the Internet. it allows users to use two VPNs to access the Internet, enhancing the reliability of bandwidth and network.
- Enter Username, Password and Server URL, then select DHCP or Static IP, one note is that IP and Subnet Mask are required for Static IP.

3 . In Advanced, open and configure Custom MTU, MAC Clone, Internet VLAN ID and others as your requirements.

-
Server Name
- The Server name, provided by ISP, indicates the name or address of PPPoE server.
-
AC(Access Concentrator) Name
- The AC name, typically designated by the ISP, identifies the Access Concentrator and distinguishes different access points.
-
Host-Uniq
- In PPPoE protocol, the Host-Uniq field is optional, used to uniquely identify requests from a host. In the same network, it ensures every request connected is unique while using PPP to connect to multi-users, avoiding confusion and conflicts.
-
Detect Online Interval
- The detect online interval is used to set the time interval for sending LCP(cLink Control Protocol) Echo request, which is a message from LCP of PPP protocol, used to verify whether the line is still valid or capable of transferring data.The appropriate interval is helpful for timely detecting and addressing link issue.
-
Custom MTU(MaximumTransmission Unit)
- The Ethernet MTU(MaximumTransmission Unit) is the largest size of a data packet that can be transmitted over the network. If your ISP requires you to adjust the MTU size, enable this option. Otherwise, we recommend you to keep it disabled for optimal network performance.
-
MAC Clone
- The MAC clone allows you to copy the MAC address from the computer to the WAN interface of the router. When an ISP restricts internet access to a single MAC address, by cloning the MAC address of the device, the router will appear as the original device, ensuring an uninterrupted internet connection.
-
Custom DNS
- The custom DNS allows you to configure optimal DNS server for the network manually, instead of using the default DNS provided by the ISP.
-
Internet VLAN ID
- The Internet VLAN ID is setted to recognizing the feature of Internet data. For specific settings, please consult your network operator's customer service or technical support staff.
4 . Click SAVE to finish configuration.
LAN Setting
DHCP server automatically assigns IP for the devices in the LAN. If it is required, you can change its setting.
1 . Click More>Network>LAN.
2 . Click to enable DHCP.

- IP Address: The IP address from which the router connects to the LAN. This can be used to log in to the router's network management page.
- Subnet Mask: The subnet mask that the router connects to the LAN.
- Set IP Address Pool: When DHCP is enabled, the router automatically assigns IP addresses to devices in the LAN from the address pool. If you need to change the address pool range, modify the Start Address and End Address.
- Lease Time: This is the lease time of the IP address that the device obtains when accessing the router. If you need to modify it, please select it again in the Lease Time drop-down list.
3 . Click SAVE to finish the configuration.
Setting Static IP Binding
It allows you to link the specific IP to the MAC address of customer devices. Using it, you can assign a fixed IP for the specific device so that the device can automatically obtain the same IP everytime it connects to the network.
 1 . Click More>Network>Static IP Binding.
2 . Click ADD in the top right corner to add a binding rule.
3 . Input the IP and MAC, then click BIND.
Setting IPv6
The IPv6 is the next generation Internet protocol, has more space for address, more advanced functions and enhanced security. It aims to solve more issues on interconnectio devices and provide better network performance and security.
 1 . Click More>Network>IPv6.
2 . Click once to enable IPv6.
3 . IPv6 WAN Settings.


- 3.1 Select corresponding Method Of Obtaining from the list, then input corresponding information:
-
DHCPv6: The router automatically obtains the parameters such as IPv6 address. No manual requirements.
-
IPv4+IPv6 PPPoE: When IPv4 Internet access is also PPPoE, you can select IPv4+IPv6 PPPoE. After enabled, IPv6 will use the IPv4 account and password to dial the number, and you do not need to manually enter the IPv6 account and password. Please note that this requires operator's support.
-
Static IPv6: Manually input IPv6(address), IPv6 Gateway, Preferred DNS and Alternative DNS.
-
4 . IPv6 LAN Settings.
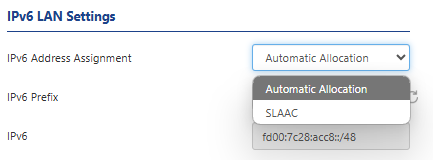
- Selecting appropriate address assignment method from the IPv6 Address Assignment list:
- Automatic Allocation: It will automatically assign IPv6 addresses to devices on the LAN network.
- SLAAC: In the SLAAC, The terminals on the LAN will automatically create IPv6 addresses according to the router. 5 . Click SAVE to finish the configuration.
IPTV Setting
Setting IPTV allows you to enjoy multimedia service while using the network. You should consult IPTV's service provider about VLAN ID and how to select IPTV Mode. Then you can select the corresponding VLAN Port, and connect IPTV's cable to the corresponding LAN port on the router.
Configuring IPTV
 1 . Enter More>Network>IPTV/VLAN.
2 . Click once to enable IPTV.
3 . Select appropriate working mode from the IPTV Mode list.
3.1 Router Mode
Enable IGMP Proxy if you use IPTV service on multiple devices at the same time.
3.2 VLAN Bridge Mode: Enter VLAN ID and select VLAN Port.
 4 . Click SAVE to finish the configuration.
- VLAN1 ID and VLAN1 LAN Port: The VLAN1 ID indicates the VLAN1, and the VLAN1 LAN Port indicates the LAN port associated with VLAN1.
- VLAN2 ID and VLAN2 LAN Port: The VLAN2 ID indicates the VLAN2, and the VLAN2 LAN Port indicates the LAN port associated with VLAN2.
Setting Dynamic DNS
Dynamic DNS(DDNS, Dynamic Domain Name System) is a function of mapping dynamic IP addresses to fixed domain names. After enabling it, the router bind dynamic WAN IP with the fixed domain so that you can connect to the router using the domain remotely. In order to use this service, you need to register for the DDNS service with your service provider.
 1 . Enter More>Network>Dynamic DNS.
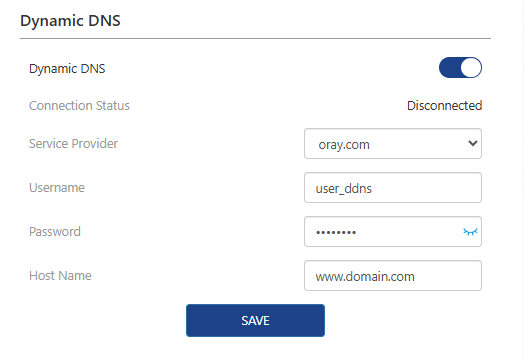
2 . Click once to enable Dynamic DNS.
3 . Select oray.com or NO-IP from the Service Provider list.
4 . Input corresponding Username, Password and Host Name from your DNS registration information.
5 . Click SAVE to finish configuration.
Note:
Different dynamic DNS service provider may provide various parameters, and the name or indication may vary. Therefore, you should look up the corresponding explanation so that the correct parameters are inputed.
Mode Selection
Configure router's working mode according to your actual requirement.
1 . Enter More>Network>Mode Selection.
2 . Select appropriate working mode from the Mode Selection list: Router Mode, LAN Bridge(AP Mode) or Repeater Mode。
Router Mode
- In routing mode, the router converts Wi-Fi signals to wireless Internet access for devices by connecting to the network operator's wired network, and provides wired Internet access for devices through a wired port.
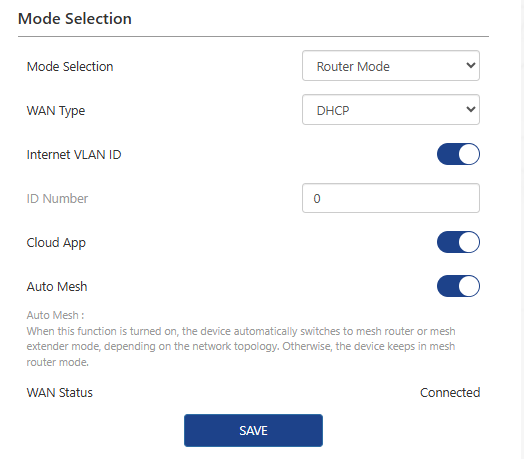
- WAN Type: DHCP, PPPoE or Static IP, inputting the corresponding parameters is required for PPPoE or Static IP.
- Internet VLAN ID: After enabling it, input ID Number.You should consult the ISP about the detailed configurations.
- Cloud App: It allows you to control devices remotely from the cloud using the APP.
- Auto Mesh: If it is enabled, the device will automatically switch to Mesh Router Mode or Mesh Extender Mode depending on the network topology; If it is diabled, the device will keep Mesh Router Mode.
- WAN Type: DHCP, PPPoE or Static IP, inputting the corresponding parameters is required for PPPoE or Static IP.
LAN Bridge(AP Mode)
- In the AP mode of extending the existing network, you should confirm your device's WAN port has connected to the Internet using the Ethernet cable. One note is that some functions are not available in this mode.

- Smart DHCP Service: If it is enabled, the router will configure IP service without connecting to the upper router. Please disable it if it is not required.
Repeater Mode
- In the repeater mode, to extend the Wi-Fi coverage, this router works as a wireless repeater of the upper router. One note is that some functions are not available in this mode.

- 1)Click NEXT to rescan the Wi-Fi signal.
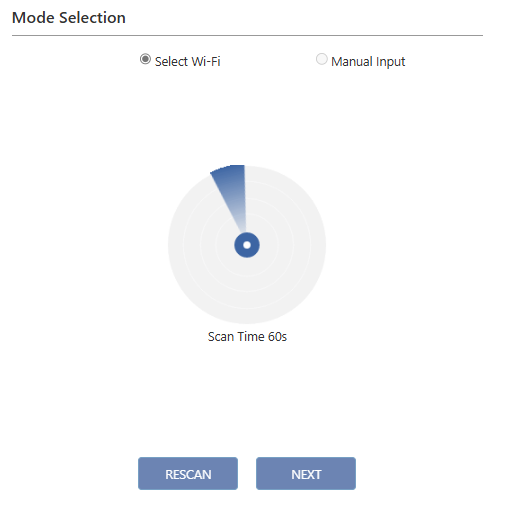
- 2) Select the wireless signal to be relayed, click NEXT.
- 3) If the network to be added is not found, click Rescan to rediscover the network.Or select Manual Input to set it up.
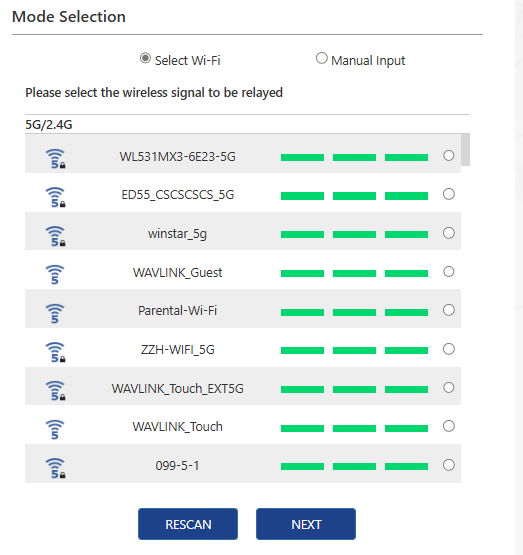
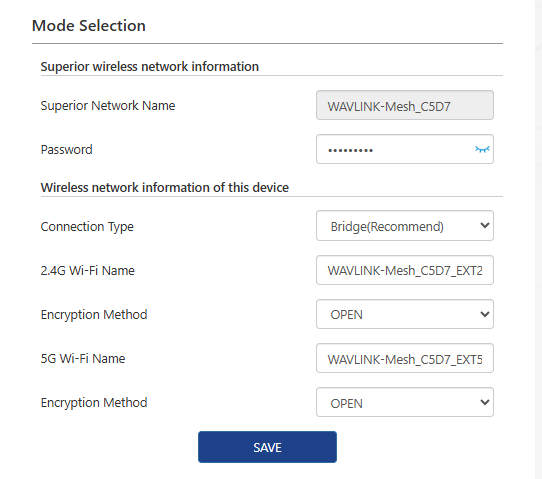
- 4)Enter the password of the superior wireless network and the wireless network information of this device. Click Save to complete the setup.
- 1)Click NEXT to rescan the Wi-Fi signal.
SQM QoS
SQM QoS uses smart queue management to classify, schedule, and prioritize network traffic, effectively controlling network congestion, ensuring bandwidth for critical applications, reducing latency, suppressing jitter, and minimizing packet loss, thereby enhancing network service quality.
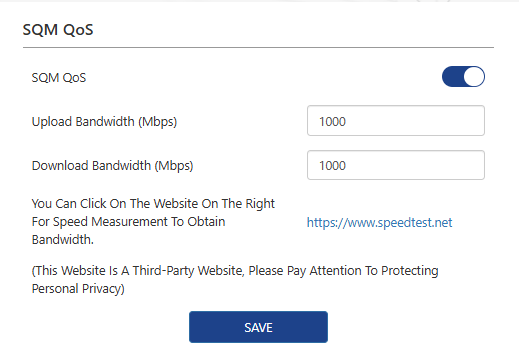
-
Navigate to More > Network > SQM QoS.
-
Click to enable SQM QoS.
-
Set the maximum Upload Bandwidth and the maximum Download Bandwidth.
-
Click SAVE to complete the configuration.