Installation
This chapter contains the following sections:
• Assembly
Installation
1.Assembly
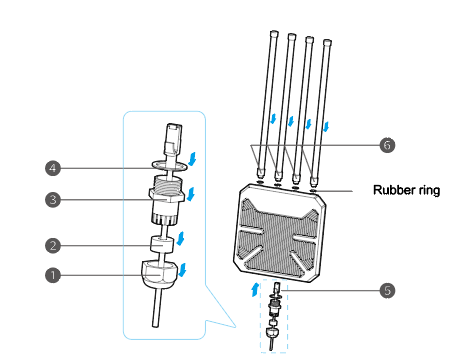 ① Pass the Ethernet cable through the hex cap.
② Pass the Ethernet cable through the sealing plug.
③ Pass the Ethernet cable through the hex stud.
④ Pass the Ethernet cable through the sealing ring.
⑤ Connect the Ethernet cable to the WAN/LAN port, screw the hex stud, insert the sealing plug into the hex stud, and screw the hex cap counterclockwise to tighten the waterproof connector using the wrench.

During assembly, turn the wrench counterclockwise to tighten the waterproof connector and clockwise to loosen it.
⑥ Screw the omni antennas into the 2.4G and 5G antenna connectors and screw up the connectors.
2.Installation
2.1 Outdoor Installation
Fix the device to the post with cable ties or fix the device to the wall with screws, then follow the assembly steps to install.

If it is installed in an area where lightning occurs frequently, we recommend installing the device via a ground connection to strengthen the lightning protection function.
2.2 Connection
2.2.1 Passive PoE
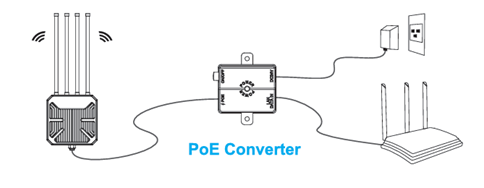
(1)Wired (For Mesh Router/Mesh AP/AP Mode)
 (2) Wireless (For Repeater Mode)
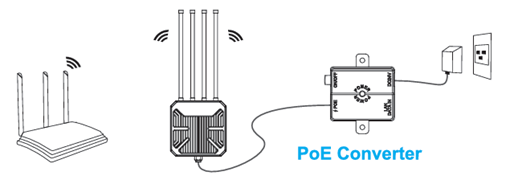 ① Connect the “PoE” port of the PoE converter with an Ethernet cable to the WAN/LAN port of the device.
② Connect one end of the power adapter to the “DC IN (37-57V)” port of the PoE converter. Then plug the other end into a power outlet.
2.2.2 Active PoE (For Mesh AP/AP/Mesh Router Mode)

- Make sure you ues a certified CAT6 or higher standard Ethernet cable with RJ45 connectors.
- Make sure the Ethernet cable length is less than 100 meters (328 feet).