Chapter 3 Network Management
This chapter contains the following sections :
• VLAN
Network Settings
The way of network access can be changed as your requirement through configurating the network setting.
Connection Configuration
- Access Network settings or Advanced>Network Settings.
- Select your network connection way from the WAN Type list.
1)DHCP(Dynamic Host Configuration Protocol)
- It assigns network information including IP, Subnet Mask, default Gateway and others for the computer, designed for small network environments such as a home or a small office, managing and assigning IP without manual configuration.
- If the ISP(Internet Service Provider) has provided Auto Assign Feature for you, select DHCP from the WAN Type list.
 2)PPPoE(Point-to-Point Protocol over Ethernet)
 - It functions as a secure connection constructor, including verifying user identity, assigning IP, and others. It is designed for broadband access methods such as ADSL, fiber optics and others to provide a secure network connection.
- If the ISP has provided a Username and Password for you, enter them after selecting PPPoE from WAN Type list, then select CONNECT.
 3)Static IP
 - It assigns fixed IP address for the computer automatically. It is designed for network connections, servers, remote access, etc., which require long-term stability to ensure the stability of network connections.
- If the ISP has provided a specificed IP parameters including IP address, Subnet Mask, Gateway, DNS1 and DNS2, select Static IP from the list and enter the information provided by the ISP.
 4)PPPoE Dual Access
 - Using dual PPPoE broadband lines, PPPoE Dual Access achieves balanced distribution via the technology of Load Balancing. Designed for improving the network bandwidth and stability, so it is for the occassion that requires large data transmission.
- Enter the account and password provided by the ISP in Username and Password. Then select DHCP or Static IP from Second WAN list, one note is that IP and Subnet Mask are required for Static IP. Click CONNECT
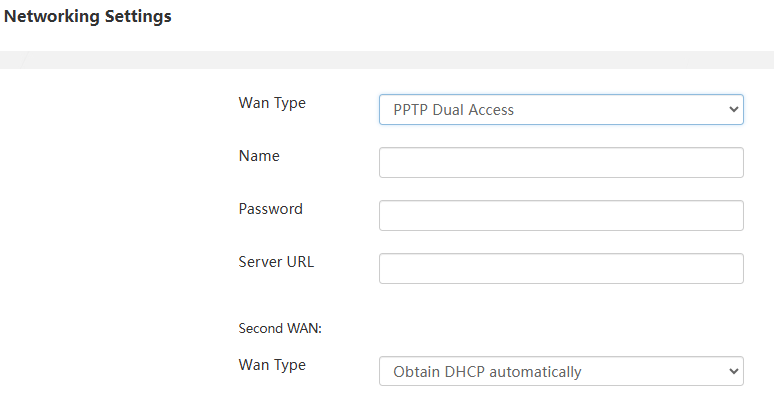
 5)PPTP Dual Access
 - PPTP Dual Access refers to the dual-network accessing method of using two PPTP VPNs. With it, users can configure two PPTP VPN to simultaneously access the Internet, enhancing the reliability of bandwidth and network.
- Enter Username, Password, Server URL, then select DHCP or Static IP, one note is that IP and Subnet Mask are required for selecting Static IP.
 6)L2TP Dual Access
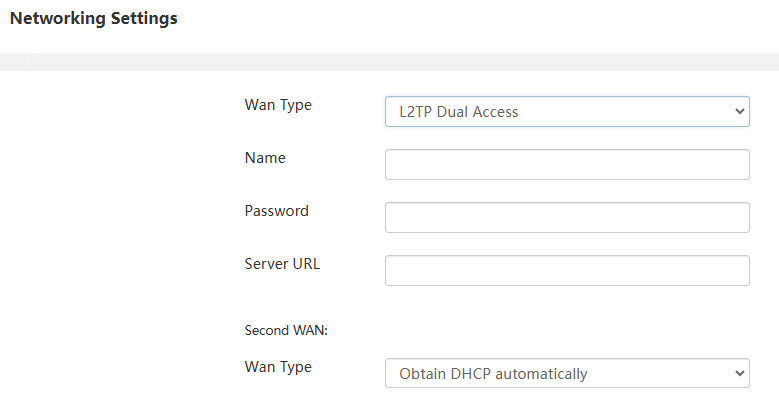
 - L2TP Dual Access uses two L2TP VPN connections to access the Internet. it allows users to use two VPNs to access the Internet, enhancing the reliability of bandwidth and network.
- Enter Username, Password and Server URL, then select DHCP or Static IP, one note is that IP and Subnet Mask are required for Static IP.
Advanced Configuration
In Advanced, open and configure Custom MTU, MAC Clone, Custom DNS and others as your requirements.

- Custom MTU(Maximum Transmission Unit)
- The Ethernet MTU(MaximumTransmission Unit) is the largest size of a data packet that can be transmitted over the network. If your ISP requires you to adjust the MTU size, enable this option. Otherwise, we recommend you to keep it disabled for optimal network performance.
- MAC Clone
- The MAC clone allows you to copy the MAC address from the computer to the WAN interface of the router. When an ISP restricts internet access to a single MAC address, by cloning the MAC address of the device, the router will masquerade as authorised devices, ensuring an uninterrupted internet connection.
- Custom DNS
- The custom DNS allows you to configure optimal DNS server for the network manually, instead of using the default DNS provided by the ISP.
LAN Settings
DHCP server automatically assigns IP for the devices in the LAN. If it is required, you can change its setting.
1 . Click Advanced>LAN Settings.
2 . Click to enable DHCP.
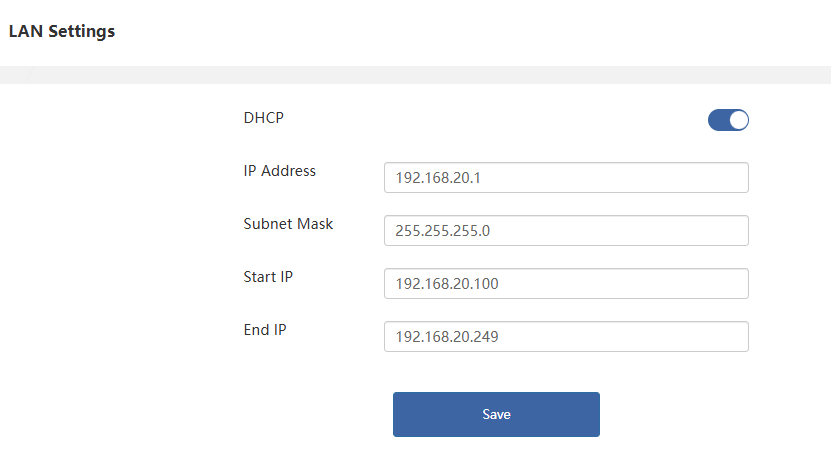
- IP Address: The IP address from which the router connects to the LAN. This can be used to log in to the router's network management page.
- Subnet Mask: The subnet mask that the router connects to the LAN.
- Set IP Address Pool: When DHCP is enabled, the router automatically assigns IP addresses to devices in the LAN from the address pool. If you need to change the address pool range, modify the Start Address and End Address.
3 . Click SAVE to finish the configuration.
Setting Static IP Binding
It allows you to link the specific IP to the MAC address of customer devices. Using it, you can assign a fixed IP for the specific device so that the device can automatically obtain the same IP everytime it connects to the network.
 1 . Click Advanced>Static IP.
2 . Click + in the bottom right corner to add a binding rule.
3 . Input the IP and MAC, then click BIND.
Setting IPv6
The IPv6 is the next generation Internet protocol, has more space for address, more advanced functions and enhanced security. It aims to solve more issues on interconnectio devices and provide better network performance and security.
 1 . Click Advanced>IPv6 Settings.
2 . Click once to enable IPv6 Settings.
3 . IPv6 WAN Settings.
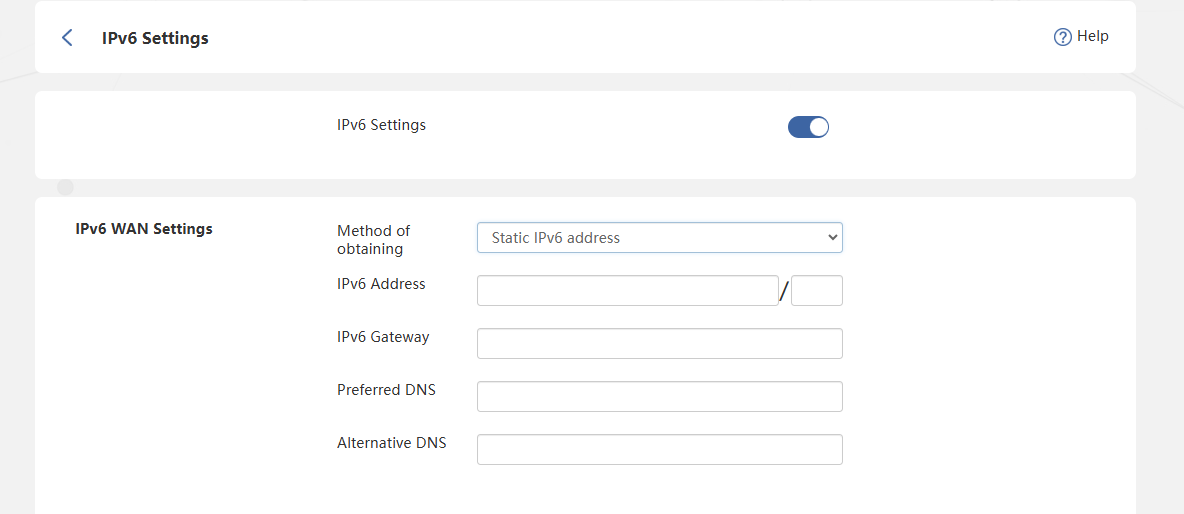 3.1 Select corresponding Method Of Obtaining from the list, then input corresponding information:
-
Automatic Acquisition: The router automatically obtains the parameters such as IPv6 address. No manual requirements.
-
IPv4+IPv6 PPPoE: When IPv4 Internet access is also PPPoE, you can select IPv4+IPv6 PPPoE. After enabled, IPv6 will use the IPv4 account and password to dial the number, and you do not need to manually enter the IPv6 account and password. Please note that this requires operator's support.
-
Static IPv6: Manually input IPv6(address), IPv6 Gateway, Preferred DNS and Alternative DNS.
4 . IPv6 LAN Settings.

- Selecting appropriate address assignment method from the Allocation list:
- Automatic Allocation: It will automatically assign IPv6 addresses to devices on the LAN network.
- SLAAC: In the SLAAC, The terminals on the LAN will automatically create IPv6 addresses according to the router.
5 . Click SAVE to finish the configuration.
VLAN
VLAN (Virtual Local Area Network) is a technology that logically divides LAN members. By default, VLANs are isolated from each other, but they can communicate through routing.
Configuring VLAN
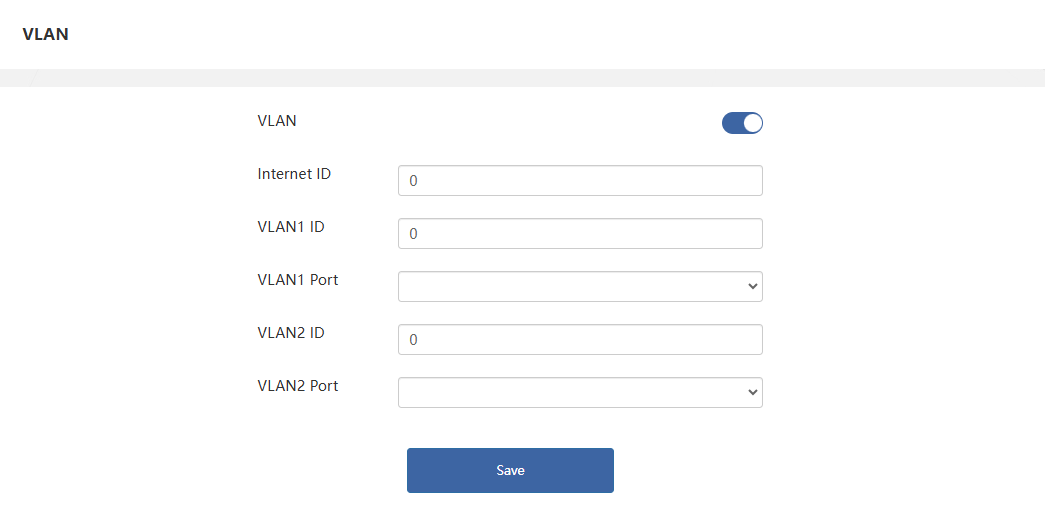 1 . Enter Advanced>VLAN.
2 . Click once to enable VLAN.
3 . Enter VLAN ID and select VLAN Port.
4 . Click SAVE to finish the configuration.
- VLAN1 ID and VLAN1 LAN Port: The VLAN1 ID indicates the VLAN1, and the VLAN1 LAN Port indicates the LAN port associated with VLAN1.
- VLAN2 ID and VLAN2 LAN Port: The VLAN2 ID indicates the VLAN2, and the VLAN2 LAN Port indicates the LAN port associated with VLAN2.
Setting Dynamic DNS
Dynamic DNS(DDNS, Dynamic Domain Name System) is a function of mapping dynamic IP addresses to fixed domain names. After enabling it, the router bind dynamic WAN IP with the fixed domain so that you can connect to the router using the domain remotely. In order to use this service, you need to register for the DDNS service with your service provider.
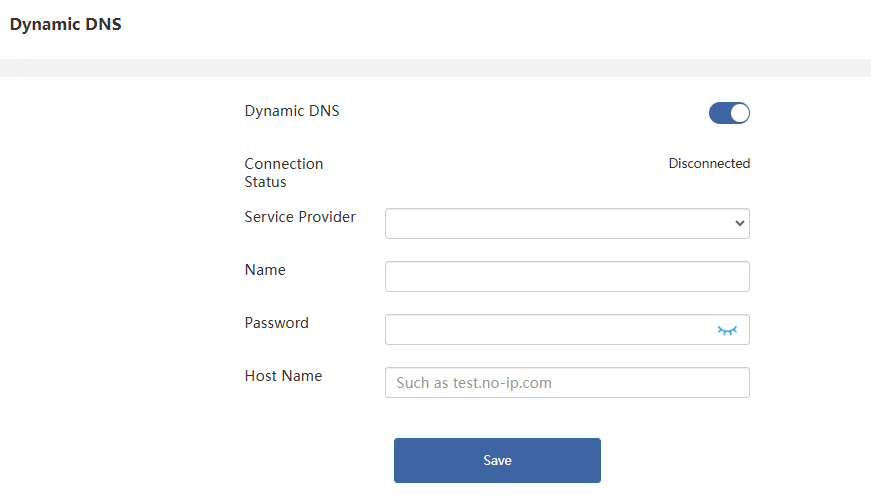 1 . Enter Advanced>Dynamic DNS.
2 . Click once to enable Dynamic DNS.
3 . Select oray.com or NO-IP from the Service Provider list.
4 . Input corresponding Username, Password and Host Name from your DNS registration information.
5 . Click SAVE to finish configuration.
Note:
Different dynamic DNS service provider may provide various parameters, and the name or indication may vary. Therefore, you should look up the corresponding explanation so that the correct parameters are inputed.
Mode Selection
Configure router's working mode according to your actual requirement.
1 . Enter Advanced>Mode Selection.
2 . Select appropriate working mode from the Mode Selection list: Router Mode, LAN Bridge(AP Mode) or Repeater Mode。
Router Mode
In routing mode, the router provides Wi-Fi Internet access point for the client by connecting to the Internet signal from the Internet Service Provider. Also provides wired internet by connecting to router's LAN via the cable.
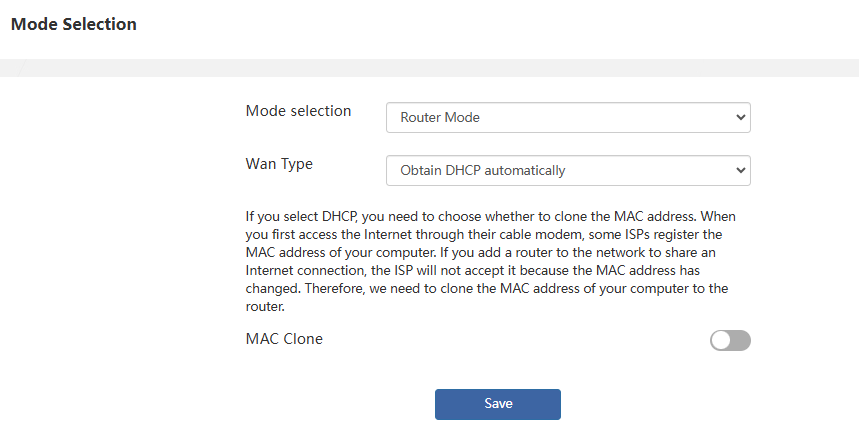 WAN Type:
① DHCP: If the ISP(Internet Service Provider) has provided Auto Assign Feature for you, select DHCP from the WAN Type list.
② PPPoE: Use this when your Internet Service Provider (ISP) has given you a Username and Password.
③ Static IP: Use this when your Internet Service Procider(ISP) has given a set of IP parameter including IP Address, Subnet Mask, Gateway and DNS.
Note: If you are unsure of the WAN Type, connect the network cable from your main router to the device's WAN port. Once you access this settings page, the device will automatically detect the appropriate WAN Type.
LAN Bridge(AP Mode)
In the AP mode of extending the existing network, you should confirm your device's WAN port has connected to the Internet using the Ethernet cable. One note is that some functions are not available in this mode.

- Smart DHCP Service: If it is enabled, the router will configure IP service without connecting to the upper router. Please disable it if it is not required.
Repeater Mode
In the repeater mode, to extend the Wi-Fi coverage, this router works as a wireless repeater of the upper router. One note is that some functions are not available in this mode.
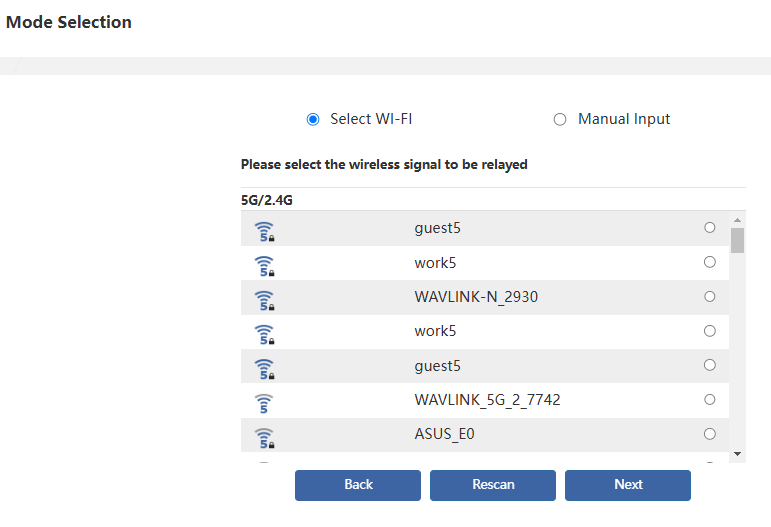
 1)Click NEXT to rescan the Wi-Fi signal.
 2) Select the wireless signal to be relayed, click NEXT.
3) If the network to be added is not found, click Rescan to rediscover the network.Or select Manual Input to set it up.
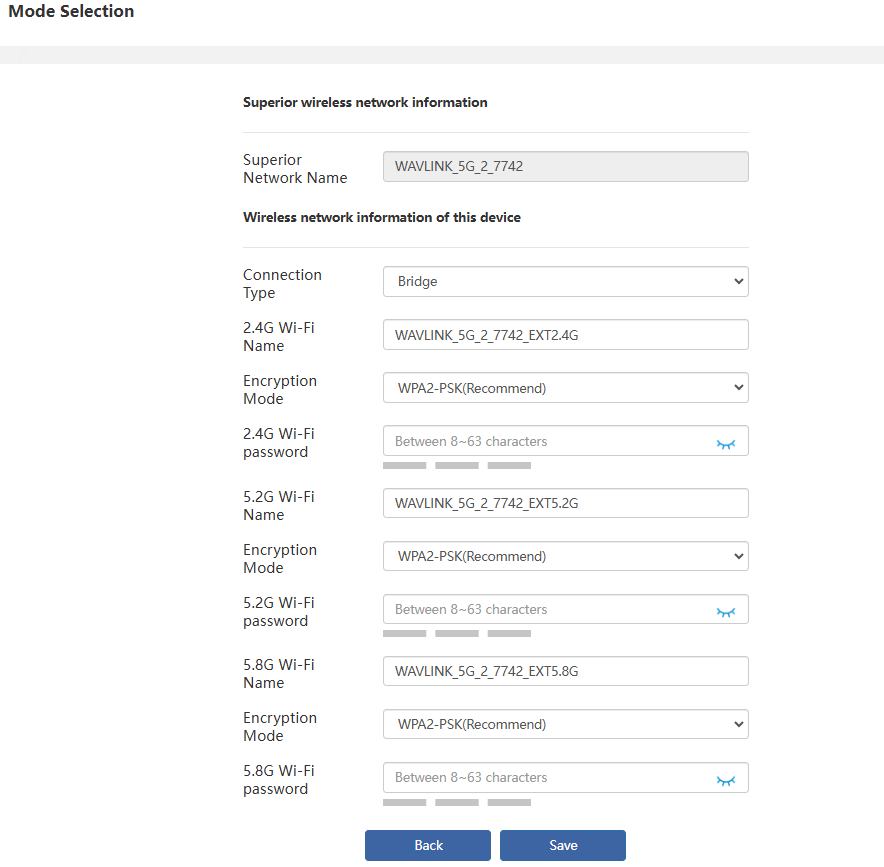
 4)Enter the password of the superior wireless network and the wireless network information of this device. Click Save to complete the setup.
Web Block
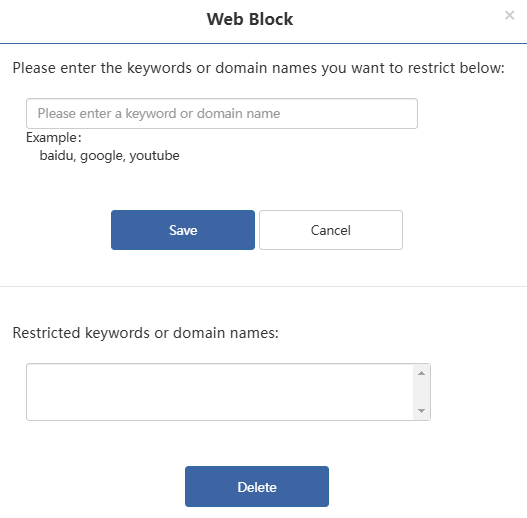
You can block any device connected to this router from accessing specific websites by entering keywords or the full domain name.
- Click + icon in Web Block.

- After entering the keywords or the full domain name, click SAVE to take effect.