Chapter 2 Overview
This chapter contains the following sections :
Overview
Introduction
This product is a 350W AC/DC intelligent battery charger, with 100-240Vac wide voltage input. It is designed for charging all types of 6V & 12V & 24V lead-acid batteries, including Lithium, LiFePO4, Wet(Flooded), MF(Maintenance-Free), CA(Calcium), EFB(Enhanced Flooded Battery), and AGM(Absorption Glass Mat) batteries. It is suitable for charging battery capacity up to 300Amp-hours and maintains all battery sizes, providing short circuit protection, over-current protection and over-voltage protection.
Specification
- Input Voltage AC: 100-240V AC, 50/60Hz Max 390W
- Output Power: 350W Max
- Charging Voltage: Various
- Charging Current: 6A(6V), 12A(6V), 6A(12V), 12A(12V), 25A(12V), 6A(24V), 12A(24V), Auto(6V, 12V, 24V)
- Low-Voltage Detection: 1V(6V), 8V(12V), 16V(24V)
- Back Current Drain: < 0.5mA
- Ambient Temperature: -20℃ to +40℃
- Type of Batteries: 6V, 12V, 24V
- Battery Capacity: Up to 300Ah, Maintains All Battery Sizes
- Cooling: Fan Convection
- Dimensions (L x W x H): 16.7x9.6x5.5cm/6.57x3.78x2.17in
- Battery Chemistries: Wet, MF, CA, EFB, AGM, Lithium, LiFePO4
Product Overview
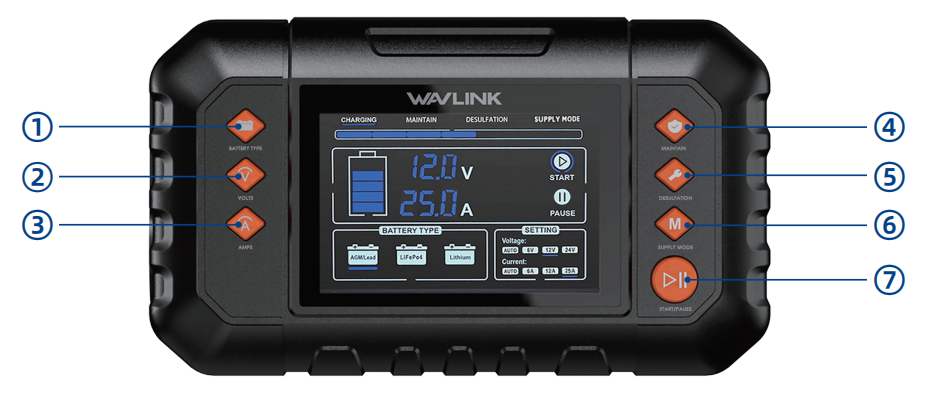
Button Illustration
| Button | Operation | Graphic |
|---|---|---|
| Button 1 | Battery Button: Press the button to choose battery type. The battery type indicator is on. | 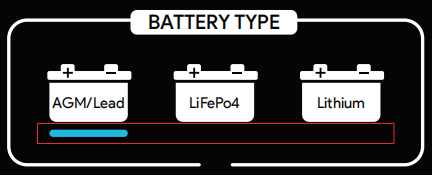 |
| Button 2 | Voltage Button: Press the button to choose voltage. The voltage indicator is on. | 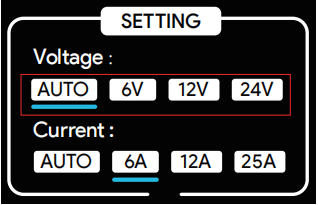 |
| Button 3 | Current Button: Press the button to choose current. The current indicator is on. | 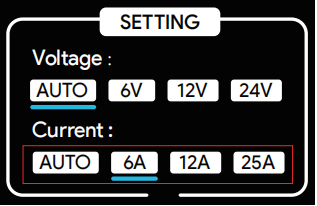 |
| Button 4 | Charging and Maintain Mode: “Charging” indicator is on. When connecting well to the battery and power, the progress bar indicator is on according to charging mode. |  |
| Button 4 | If the battery is not used for a long time, press the button to select maintain mode. The battery is charging by a smaller current to maintain. “Maintain” indicator is on. The progress bar cyclically flashes. (“Maintain” mode is only for Lead Acid Battery.) |  |
| Button 5 | Desulfation Mode (Lead Acid Battery Only): If the battery is used for a long time and the capacity is used up soon. Press the button and use “Desulfation” mode to charge the battery. “Desulfation” indicator is on. The progress bar cyclically flashes. |  |
| Button 6 | Supply Mode: When battery is connected well, but it can not be detected. Press the button and use “Supply” mode to charge the battery. The “Supply” indicator is on. The progress bar cyclically flashes. |  |
| Button 7 | Start and Pause Button: When set well, press the button. “Start”indicator is on, indicating the charger is working. Press the button under working condition. “Pause” indicator is on, indicating the charger does not work. |  |
Graphic Indication
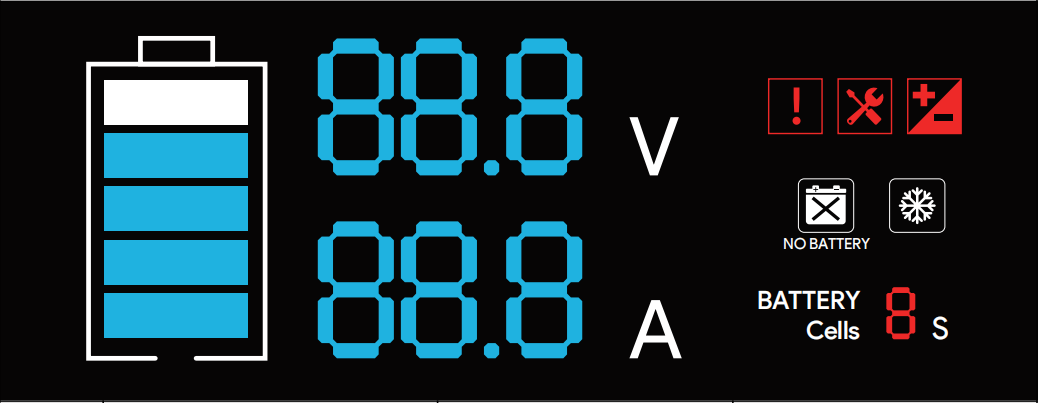
| S/N | Graphic | Indicator | Explanation |
|---|---|---|---|
| 1 |  | Show battery cell number | In professional mode, it displays battery cell number; In normal mode, nothing displayed. |
| 2 |  | On or flash | Warning Over current, Short circuit |
| 3 |  | On | Charging in “Desulfation” |
| 4 |  | On | The battery is connected reversely. |
| 5 |  | On | Battery not connected /Battery anomaly. |
| 6 |  | On | Ambient temperature for charging. |
| 7 |  | On | Show battery capacity. |
| 8 |  | \ | Show charging voltage. |
| 9 |  | \ | Show charging current. |
| 10 |  | Display number | Description of error codes. Please find the below indication for error codes. |
Failure Code
When the machine cannot be charged during use, the product screen will show error codes. Please find the description of them.
| Error Code | Description |
|---|---|
| 01.E | The battery's output electrode is reversed. |
| 02.E | The charger output is short-circuited. |
| 03.E | The internal temperature of the product is too high. |
| 04.E | The output charging mode is selected incorrectly. |
| 41.E | The output voltage is too high. |
| 42.E | The output current is too high. |
| 43.E | The battery is in abnormal condition. |
Progress Bar Indication

① The battery is detected as a normal condition.
② Desulfation stage,only for lead acid battery.
③ Small current charging mode.
④ Bulk charging mode.
⑤ ABS mode.
⑥ Floating charging mode.
⑦ Full charged.